SQL Database Mirroring in Microsoft SQL Server 2014
Database Mirroring is a useful tool for disaster recovery although other High Availability solutions are typically preferred for this. Personally I find this feature most useful for creating databases I can divert users/applications to for resource intensive queries where up to the minute data isn't required. In the example below I will show you the steps needed to implement database mirroring which updates every 15 minutes throughout the day. The example below is taken from SQL Server 2014 although earlier versions are very similar. The interface is only slightly different. As a side note, it was published that this feature was due to be depreciated in later versions of SQL Server. It is my understanding at the time of this post that Microsoft are no longer intending to depreciate this.
Pre-requisites
You must have at least SQL server standard with SQL server agent running. This is not available in SQL Express.Access to SQL Server Management Studio (SSMS) with a sysadmin account or the 'sa' account.
The recovery model of the database you want to mirror should be in full recovery mode.
There should not be an enabled maintenance plan to carry out transaction log backups.
Backup the database
Step 1 is to take a backup of the database you want to mirror. This can be done by either right clicking the database > Tasks > Back up or by executing your backup maintenance plan if you have one set up (you should!).Creating your mirror database
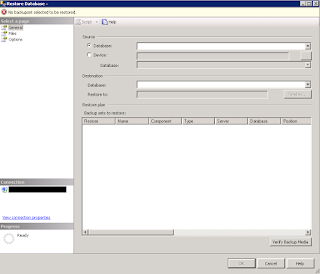
On the server/instance you wish to setup your mirror database on, right click Database > Restore DatabaseAt the top of the page under 'Source', select the radio button 'Device:'
Browse to your database backup using the three dots (...)
In the 'Database' dropdown, the name of the orignal database will be shown.
Under 'Destination', clear the contents of the drop down box and enter a name for your mirror database. I like to call mine the same as the original database with _MIRROR at the end.
Under 'Restore plan' at the bottom you should see your backup file with a tick next in the Restore column.
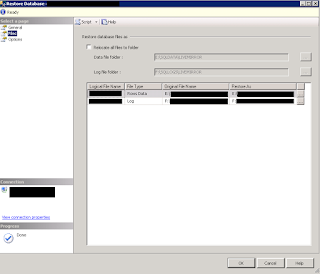
From the 'Select a page' section on the left, click 'Files'
WARNING, DO NOT ACCEPT THE DEFAULTS HERE WITHOUT CHECKING THAT THE 'RESTORE AS' LOCATIONS AREN'T OVERWRITING FILES.
This page will show you where your database and log files will be stored on the server.
As stressed above, pay attention here to the 'Restore As' column. Click into the fields or onto the three dots and locate/name the files appropriately. Best practise is to store the database (.mdf) and logs (.ldf) files on different disks although only you can decide if this is feasible/necessary based on your resources and how much these files will be utilised.
Lastly from the 'Select a page' section on the left, go into Options.
With my example of a mirror database that you only want to query, not update, you would want to leave the database in standby mode. This will mark it as read only but will allow you to update using log shipping which I will come onto in the next step. To set it to this mode, drop down 'Recovery state:' and select RESTORE WITH STANDBY.
With these steps complete you can now click OK and the restore process will begin. Once complete you should see your database under Databases in SSMS in grey with its name followed by ( Standby / Read-Only )
Shipping transaction logs to keep your mirror up to date
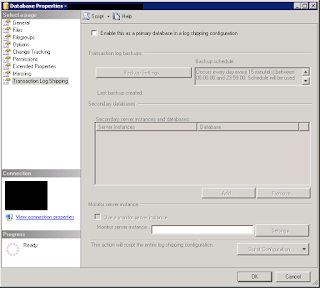
With your mirror database setup it is now time to ship transaction logs from your live database into the mirror to keep it up to date.Right click on the live database > Tasks > Ship transaction logs ...
Tick the box at the top of the screen 'Enable this as a primary database in a log shipping configuration'
Click the 'Backup Settings' button under 'Transaction log backups'
Choose somewhere to store your transaction log backups. I would recommend a separate server for just in case you need to replay these logs into your live database for disaster recovery. You will need to make a shared folder and give the SQL Server service account access to it (or everyone, less secure). Enter this shared path into the top two boxes. I like to keep 3 Days of transaction logs and have it set to alert me if no backup occurs within 1 hour but you may wish to set this up differently.
Click the 'Schedule...' button under 'Backup job'
In this window, set the schedule for how often you want transaction log backups to be taken of the live database. This will vary for how up to date you need your mirror to be. You may want the backup to occur every 5 minutes, perhaps you will only need it on the hour. I like to backup every 15 minutes. With the schedule set, click OK.
Now onto configuring SQL to send these transaction logs to your mirror database. Under 'Secondary databases' click the 3 dots
On the next window, connect to your database/instance and enter the secondary database name. Select No, the secondary database is initialised
On the Copy Files tab, enter the destination to copy the transaction logs to on the mirror server
On the Restore Transaction Log tab, tick standby mode and tick disconnect users
Click OK
Back on the first screen, click OK and your transaction log shipping setup is complete. Transaction logs will now be backed up and restored into the secondary (mirror) database every 15 minutes.


No comments:
Post a Comment