If you are going to be shrinking a log file using this method you should have the database in simple recovery mode. Transaction log backups will no longer be required to shrink the log file but not having them will impact disaster recovery so make sure this is what you want. For me I only require my nightly backups on databases where I have this set up.
To shrink a log file as part of a maintenance plan task, first find out the fileID of the log file. To do this, open a new query window in SSMS and run select * from sys.sysfiles
From the table this displays it will show you the fileid of the database and log files. Make a note of the log file ID number that you want to shrink.
Now open a new maintenance plan (or add this as a step to an existing one) and drag in an Execute T-SQL Statement Task box. Double click this to bring up the windows wher you can enter in your T-SQL code.
Type into this window the following, substituting DBNAME from the name of the database you want to shrink the log file for and fileID for the ID number we noted for the log file before.
use [DBNAME];
dbcc shrinkfile(fileID,500);
Be sure to include the square and rounded brackets and the semicolons as above. This will now attempt to shrink the log file down to 500mb or as close to that as it can. You can set this lower if you wish but if you are shrinking it too low and it needs to grow more you will end up with disk fragmentation.
Wednesday 7 October 2015
Wednesday 2 September 2015
Does my MS SQL Server have enough RAM?
MS SQL Server RAM - Reommendations
People often ask "How much RAM does my SQL server need". The usual answer is "As much as you can give it".While yes, usually you won't find that RAM will go to waste if you give it all the RAM you have, sometimes it just isn't necessary.
Rule number 1 I've found is that it's nice to aim to have as much RAM as you have for the size of your database. Usually this won't be feasible though.
The other thing you can look at is the Page Life Expectancy (PLE) performance counter that is installed along with SQL Server. To check this, launch Performance Monitor and add the counter Page Life Expectancy found under SQL server:Buffer Manager.
This value should never drop below 300. If it does then this means that the buffer is flushing out pages too often. This will mean that data will need to be read from disk more often rather than being stored and read from memory. What you want is for your frequently accessed data to be stored in memory as it will always be faster than disks. 300 really is a bare minimum and will mean that pages are being kept for 300 seconds before being flushed out. If you have enough RAM though, pages will be kept for longer. To put into perspective, some of my production database servers sit at a PLE value of over 30,000.
You also want to make sure that you are assigning a maximum amount of memory for SQL server to be allowed to use rather than letting it consume all the memory allocated to the server. Try to give at least 5gb RAM for the operating system and non SQL server processes to use. To limit the amount SQL can use, open SQL Management Studio, connect to you database engine instance and right click the top level in Object Explorer where the name of the instance is. Go into properties and open the memory tab. In here, set the Maximum server memory (in MB) as appropriate. For example if you have given your server 60GB of RAM, you may want to set SQL to be allowed a maximum of 50000 MB (just under 50GB) leaving just over 10GB for your operating system and any non SQL Server processes.
Copying data between Windows servers
Copying data between Windows servers
If you have a large amount of data to copy from server to server, such as in the case of a server migration, there is a command line program you can use called robocopy which is much more reliable than your usual copy and paste and will also allow you to keep a log of the copy operation to make sure everything went ok. This comes inbuilt with windows and is run as below.
First off, Mount the destination you want to copy to as a network drive on the source server
Open a command prompt, running as administrator (right click - run as admin)
Run the command below, substituting E for the drive letter you are copying from and Z for the letter you have mounted the network drive to.
robocopy "E:\Path\To\Source\Files" "Z:\Path\To\Network\Drive\Destination" /mir /sec /log:"C:\copylog.txt
This will do a command line copy of the data in the E drive location to the Z drive location. This will also log everything it is doing to the file C:\copylog.txt
Setup SQL Express Database Backups
Setup SQL Express Database Backups
Open up notepad and enter the following:
sqlcmd -S SERVERNAME\INSTANCENAME -Q "BACKUP DATABASE DATEBASENAME TO DISK='E:\BACKUP\PATH\FILENAME.bak' with INIT"
Save this file as a .bat file. Now you just need to set up a scheduled task to run this file.
Beware, this will overwrite the file every day as it is using the same file name. There are scripts out there which will let you put in a date stamp to get around this but for my purposes I can make do with this as the files are backed up daily to another server anyway.
Extending a VMWare RHEL Logical Volume
Extending a VMWare RHEL Logical Volume
To extend a logical volume within an VMWare virtual machine, follow these steps
1. Turn off VM
2. Change disk size
3. Turn on VM
4. Run fdisk -l to find name of disk that needs to be extended (/dev/sda by default for primary disk)
5. Run fdisk /dev/sda (or whatever disk is called from step above)
6. Enter p to print partition table
7. Enter n for new primary partition
8. Enter p for new primary
9. Enter the next available partition number based on the output from step 6
10. Enter the next free cylinder block if this isn’t already defaulted
11. Leave last cylinder block as default
12. Enter t to change partition type
13. Enter 8e to set Linux LVM
14. Enter w to write the partition table changes
15. Restart the VM
16. Run fdisk -l to confirm new partition is there
17. Run pvcreate /dev/sda3 (or whatever the partition created was called
18. Run vgextend vg_volgroupname /dev/sda3 substituting vg_volgroupname for the name of the volume group you are extending and /dev/sda3 for the name of the partition that was created
19. Run lvextend /dev/vg_ volgroupname/lv_logvolname /dev/sda3 substituting volgroupname and logvolname for the names of the volume group and logical volume. Change /dev/sda3 for the name of the new partition
20. Run resize2fs /dev/vg_volgroupname/lv_logvolname substituting volgroupname and logvolname for the names of the volume group and logical volume or ext2online /mountpoint if you get an error that an online partition can’t be resized
21. Run df -h to check that the volume is now extended
22. Reboot the server to check it comes back up ok and check the space again with df -h
SQL Database Mirroring in Microsoft SQL Server 2014
SQL Database Mirroring in Microsoft SQL Server 2014
Database Mirroring is a useful tool for disaster recovery although other High Availability solutions are typically preferred for this. Personally I find this feature most useful for creating databases I can divert users/applications to for resource intensive queries where up to the minute data isn't required. In the example below I will show you the steps needed to implement database mirroring which updates every 15 minutes throughout the day. The example below is taken from SQL Server 2014 although earlier versions are very similar. The interface is only slightly different. As a side note, it was published that this feature was due to be depreciated in later versions of SQL Server. It is my understanding at the time of this post that Microsoft are no longer intending to depreciate this.
Pre-requisites
You must have at least SQL server standard with SQL server agent running. This is not available in SQL Express.Access to SQL Server Management Studio (SSMS) with a sysadmin account or the 'sa' account.
The recovery model of the database you want to mirror should be in full recovery mode.
There should not be an enabled maintenance plan to carry out transaction log backups.
Backup the database
Step 1 is to take a backup of the database you want to mirror. This can be done by either right clicking the database > Tasks > Back up or by executing your backup maintenance plan if you have one set up (you should!).Creating your mirror database
On the server/instance you wish to setup your mirror database on, right click Database > Restore Database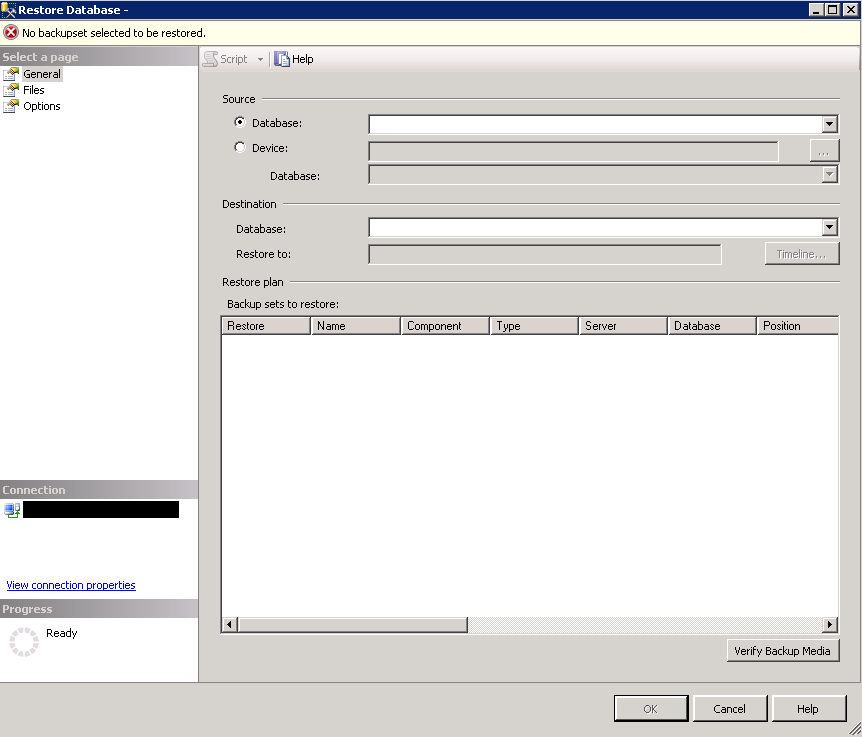
At the top of the page under 'Source', select the radio button 'Device:'
Browse to your database backup using the three dots (...)
In the 'Database' dropdown, the name of the orignal database will be shown.

Under 'Destination', clear the contents of the drop down box and enter a name for your mirror database. I like to call mine the same as the original database with _MIRROR at the end.
Under 'Restore plan' at the bottom you should see your backup file with a tick next in the Restore column.

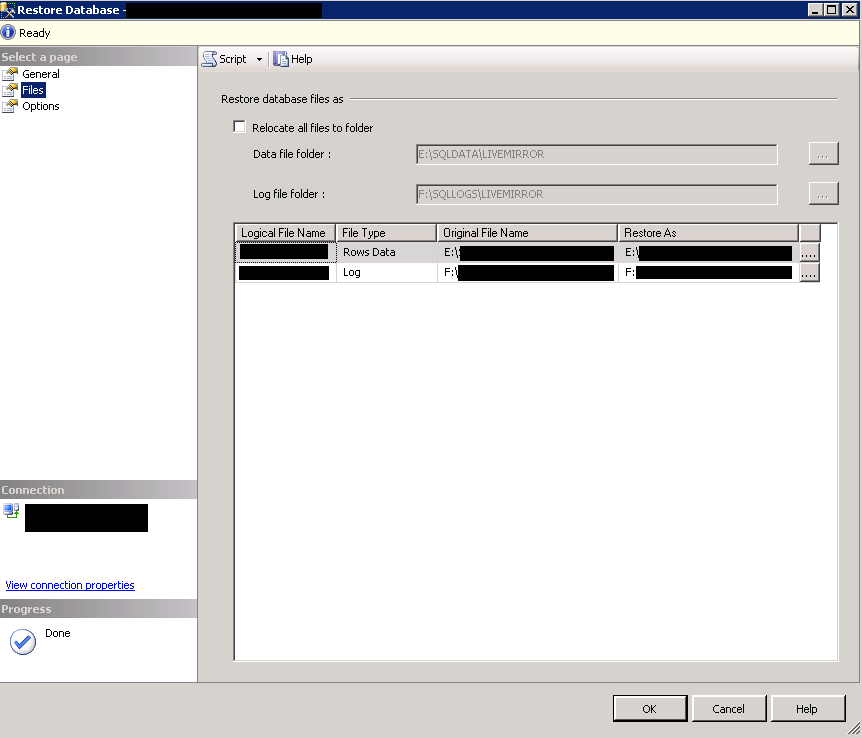
From the 'Select a page' section on the left, click 'Files'

WARNING, DO NOT ACCEPT THE DEFAULTS HERE WITHOUT CHECKING THAT THE 'RESTORE AS' LOCATIONS AREN'T OVERWRITING FILES.
This page will show you where your database and log files will be stored on the server.
Lastly from the 'Select a page' section on the left, go into Options.

With my example of a mirror database that you only want to query, not update, you would want to leave the database in standby mode. This will mark it as read only but will allow you to update using log shipping which I will come onto in the next step. To set it to this mode, drop down 'Recovery state:' and select RESTORE WITH STANDBY.
With these steps complete you can now click OK and the restore process will begin. Once complete you should see your database under Databases in SSMS in grey with its name followed by ( Standby / Read-Only )

Shipping transaction logs to keep your mirror up to date
With your mirror database setup it is now time to ship transaction logs from your live database into the mirror to keep it up to date.Right click on the live database > Tasks > Ship transaction logs ...

Tick the box at the top of the screen 'Enable this as a primary database in a log shipping configuration'
Click the 'Backup Settings' button under 'Transaction log backups'

Choose somewhere to store your transaction log backups. I would recommend a separate server for just in case you need to replay these logs into your live database for disaster recovery. You will need to make a shared folder and give the SQL Server service account access to it (or everyone, less secure). Enter this shared path into the top two boxes. I like to keep 3 Days of transaction logs and have it set to alert me if no backup occurs within 1 hour but you may wish to set this up differently.

Click the 'Schedule...' button under 'Backup job'

Now onto configuring SQL to send these transaction logs to your mirror database. Under 'Secondary databases' click the 3 dots

On the next window, connect to your database/instance and enter the secondary database name. Select No, the secondary database is initialised

On the Copy Files tab, enter the destination to copy the transaction logs to on the mirror server

On the Restore Transaction Log tab, tick standby mode and tick disconnect users

Click OK
Back on the first screen, click OK and your transaction log shipping setup is complete. Transaction logs will now be backed up and restored into the secondary (mirror) database every 15 minutes.
New Active Directory Users not appearing in SysAid
New Active Directory Users not appearing in SysAid
I've just finished configuring my new install of Sysaid and have to say it is by far my favourite piece of helpdesk software. Customisation is easy and it is very user friendly. One issue I have had though is that from time to time new users aren't being pulled across from Active Directory. You should also be able to follow the final step of this guide if you are configuring LDAP integration for the first time.
- Log onto the server hosting your Sysaid installation
- Browse to %SysAidServer%\root\WEB-INF\userfiles
- Delete the folder within, named after your account
- Restart the 'SysAidServer' service
- Within Sysaid, go to Settings > Integration > LDAP and click the LDAP configuration wizard button

Re enter your LDAP details into the box and click save

Now scroll to the bottom and set the Schedule; Start Time to a few minutes into the future, make sure the box is ticked and the Rerun box is set to day
Now click save and your user list should refresh when the scheduled time arrives
Subscribe to:
Posts (Atom)